
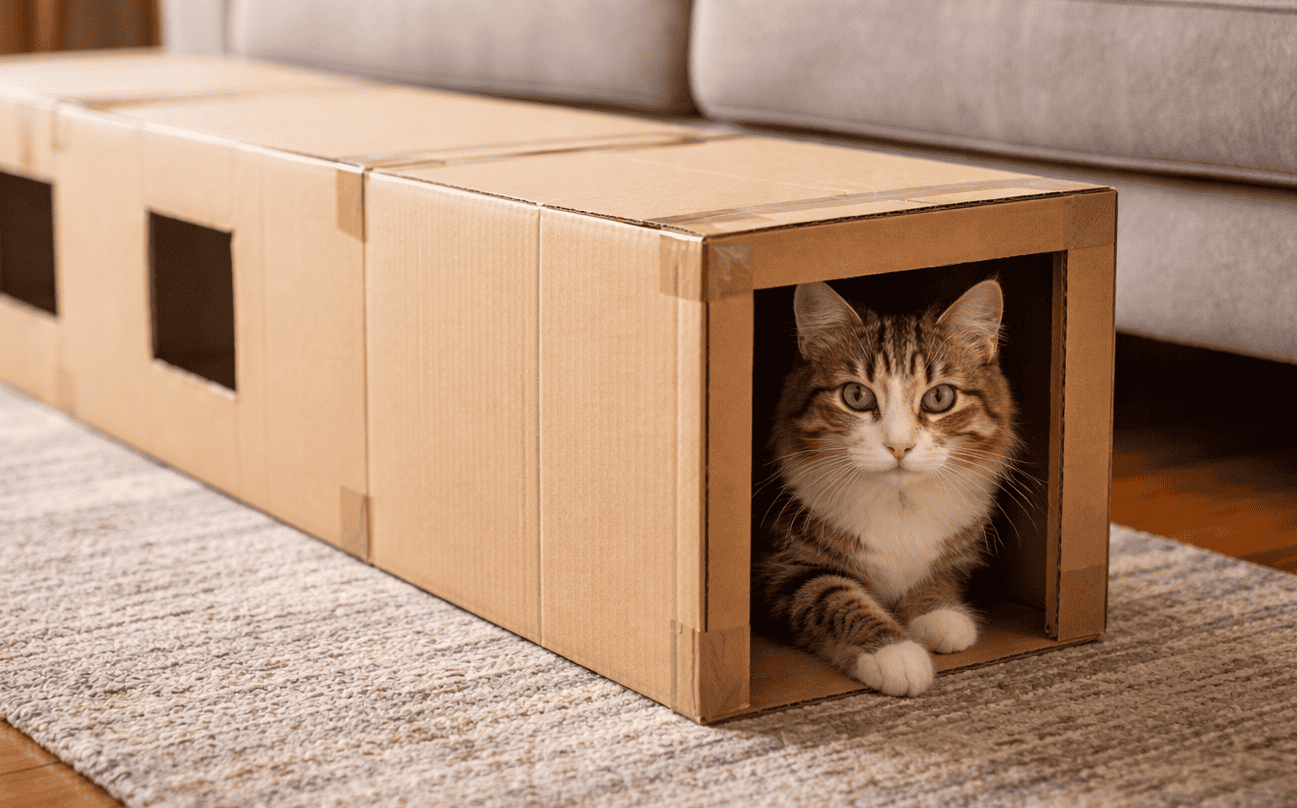
How to Make a DIY Cat Tunnel Your Cat Will Actually Use

Your cat ignores the $50 cat tree but spends twenty minutes a day inside the cardboard box it came in.
Here’s what she knows that you don’t: enclosed spaces aren’t just fun. They’re instinctive. Cats are ambush predators hardwired to hide, stalk, pounce, and disappear. A tunnel gives them exactly that: a narrow, covered space where they can watch, wait, and launch at exactly the right moment.
Cats often respond to tunnels instantly, even cats who’ve never cared about toys. Something about the shape, the enclosure, the two escape routes triggers deep satisfaction. And the best part? You don’t need to buy one. A few cardboard boxes, an old blanket, or some grocery bags can become a tunnel in under ten minutes.
This guide walks you through five easy ways to make cat tunnels using things you already have. No sewing. No trips to the store. Just practical setups that tap into what your cat’s brain is wired to do.
What Makes a Good DIY Cat Tunnel
Size and Shape That Actually Work
Not all tunnels work equally well. Too narrow and your cat feels trapped. Too wide and it loses the enclosed feeling they crave.
For most cats, 10 to 12 inches in diameter works. Smaller cats and kittens can handle 8 to 10 inches. Larger cats like Maine Coons or Ragdolls might prefer at least 12 to 14 inches to move comfortably.
Length matters less than you’d think. Even a short 2-foot tunnel works if it’s stable. Longer tunnels (4 to 6 feet) let cats build speed, but they’re not necessarily essential.
Shape affects use too. Straight tunnels encourage running. Curved or S-shaped tunnels slow cats down and add mystery — they can’t see the exit, which makes exploration more interesting. Both work. You can rotate between them and see what your cat prefers.
Stability Matters More Than You Think
A tunnel that collapses when your cat enters it will be ignored forever.
Before introducing any tunnel, test it. Push on the sides. Lean gently on the top. Make sure it holds shape and doesn’t tip or slide.
For cardboard tunnels, reinforce seams with packing tape. If it sits on a smooth floor, place a non-slip mat underneath.
Fabric tunnels need structure, such as wire hoops, spring frames, or stiff inserts. Without support, they sag and lose the tunnel effect entirely.
If you’re using furniture or cushions, make sure everything is weighted. A collapsing blanket mid-run will startle your cat and ruin the whole thing.
Sound and Texture Are Also Key
Cats notice how things feel and sound. Crinkly materials, like parchment paper, tissue, certain fabrics, add feedback that many cats find irresistible. The rustle mimics prey movement, which triggers curiosity.
Texture matters too. Soft fleece feels different than bare cardboard, which feels different than slick fabric. Cats gather sensory information through paws and whiskers, so varied textures keep tunnels interesting.
You don’t need to go overboard. Adding crinkly paper inside a cardboard tunnel or draping a towel over the entrance can noticeably change how your cat interacts with it.
5 Easy DIY Cat Tunnels You Can Make at Home
#1. The Cardboard Box Tunnel

A cardboard box tunnel is one of the simplest options and it works surprisingly well.
What you need:
- 2 to 4 cardboard boxes (similar size)
- Packing tape
- Box cutter or scissors
How to make it:
- Cut off all flaps on both ends of each box. You want open tubes.
- For windows, cut 4- to 6-inch holes in the sides. Big enough to peek through, not so big your cat loses the enclosed feeling.
- Line boxes up end-to-end and tape them together firmly inside and out. Use several strips to reinforce connections.
- Test by pressing gently. If it wobbles or seams separate, add more tape.
- Place on a rug to prevent sliding.
Tips:
- Leave some boxes plain, add windows to others.
- Angle boxes slightly for a curved tunnel instead of straight.
- On hardwood or tile, tape bottom edges down or use a non-slip mat.
A cardboard tunnel is ideal for active cats who love running, pouncing, and high-speed play—the rigid structure holds up to rough use and encourages full-sprint tunnel dashes.
#2. The Pillow and Cushion Tunnel
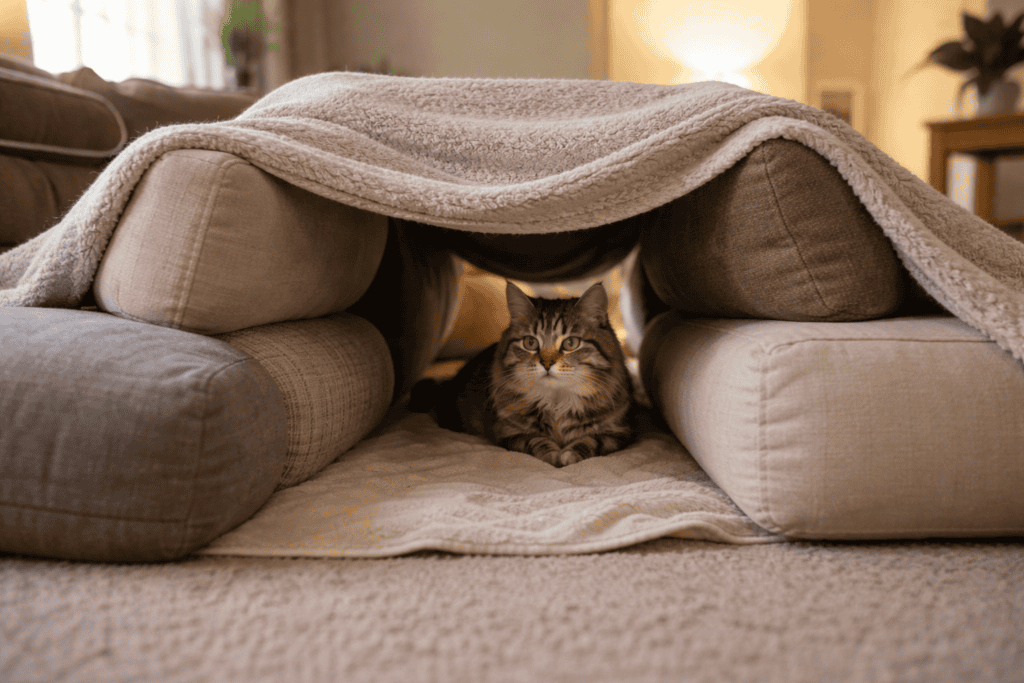
With no cutting required, a pillow and cushion tunnel is the fastest option and great for testing out whether your cat actually enjoys being in a tunnel.
What you need:
- 4 to 6 large cushions or throw pillows
- 1 blanket or towel
- Clips or weights (optional)
How to make it:
- Arrange cushions in two parallel rows, leaving 10 to 12 inches between them.
- Drape the blanket over the top so it hangs down on both sides, creating walls.
- Leave both ends open.
- Use clips or weights to hold edges if the blanket slips.
- Press gently on sides to check stability. Adjust cushions if needed.
Tips:
- This collapses easily, so not ideal for cats who run at full speed.
- Works better on carpet than smooth floors.
- Add a soft mat inside for comfort.
- Toss a toy, treat, or catnip inside if your cat hesitates.
This type of tunnel is perfect for older cats, anxious cats, or cats who prefer gentler play. The soft materials muffle sound and feel less overwhelming than rigid tunnels.
#3. The Duvet or Blanket Tunnel
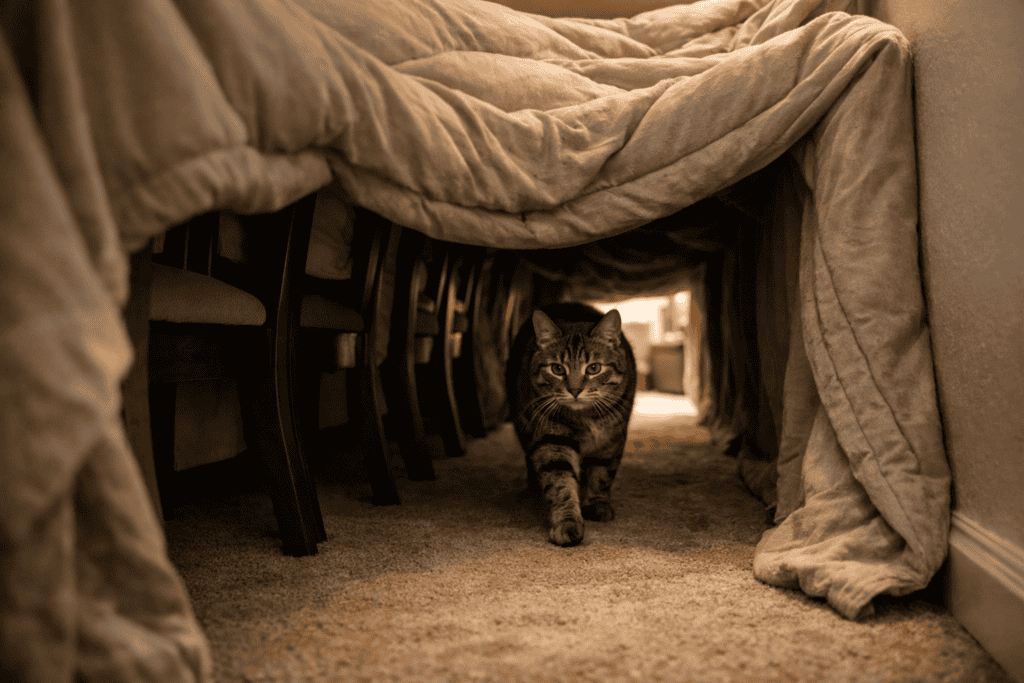
No cutting or taping this time, just furniture and fabric.
What you need:
- 2 to 4 chairs (dining chairs or folding chairs work)
- 1 large blanket, duvet, or sleeping bag
- Clips, clothespins, or heavy books (optional)
How to make it:
- Line up chairs in a row, spaced about 2 to 3 feet apart. Make sure they’re stable and won’t tip.
- Drape the blanket or duvet over the chairs so it hangs down on both sides, creating walls.
- Leave both ends open so your cat can enter and exit freely.
- Check that the blanket doesn’t sag in the middle and block the path. If it does, add a box or stool underneath to support the center.
- Secure the blanket edges with clips or weigh them down with books if they keep sliding off.
Tips:
- Use heavier fabric like a duvet or thick blanket; lightweight materials sag too easily.
- Place the tunnel along a wall for extra stability.
- If you don’t have suitable chairs, cardboard boxes stacked at the same height work just as well.
- This tunnel comes apart in seconds, so it’s ideal if you need to reclaim the space quickly.
This setup works especially well for cats who like longer, covered pathways. The fabric blocks light and sound, which makes it feel more like a proper hideout than a simple cardboard tube.
#4. The Towel-and-Tube Tunnel
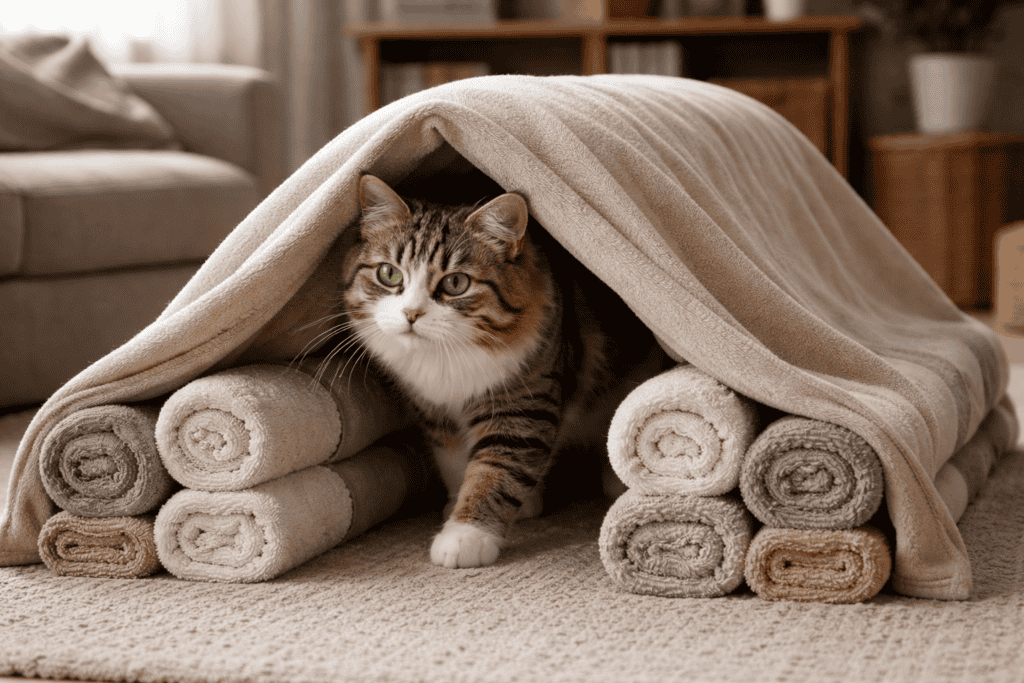
The towel and tube option is slightly more structured and holds its shape better than fabric alone.
What you need:
- 3 to 4 thick towels (bath towels work best)
- PVC pipe, wrapping paper tubes, or stacked toilet paper rolls (for frame)
- Large blanket or sheet
- Tape or zip ties (if using PVC)
How to make it:
- Roll each towel tightly lengthwise to create firm tubes.
- Lay the rolled towels on the floor in two parallel rows, about 10 inches apart. These act as the frame.
- Drape a blanket or sheet over the towels so it forms a tent-like cover.
- Secure the blanket edges by tucking them under the towels or weighing them down.
- If using PVC pipe instead of towels, cut two pieces about 3 to 4 feet long, place them parallel, and drape fabric over them. Tape or zip-tie the fabric to the pipes if needed.
Alternative version with stacked rolls:
- Stack toilet paper or paper towel tubes horizontally in two rows.
- Tape them together to create stable “beams.”
- Drape fabric over the top.
Tips:
- PVC pipe is sturdier but requires a trip to the hardware store.
- Rolled towels work immediately and cost nothing.
- This tunnel holds its shape better than the pillow version but isn’t as rigid as cardboard.
- Great for cats who like tunnels but also enjoy soft textures.
The towel-and-tube method is a middle ground between floppy fabric tunnels and rigid cardboard ones. It’s firm enough not to collapse and soft enough that anxious cats don’t find it intimidating.
#5. The Multi-Level Tunnel System
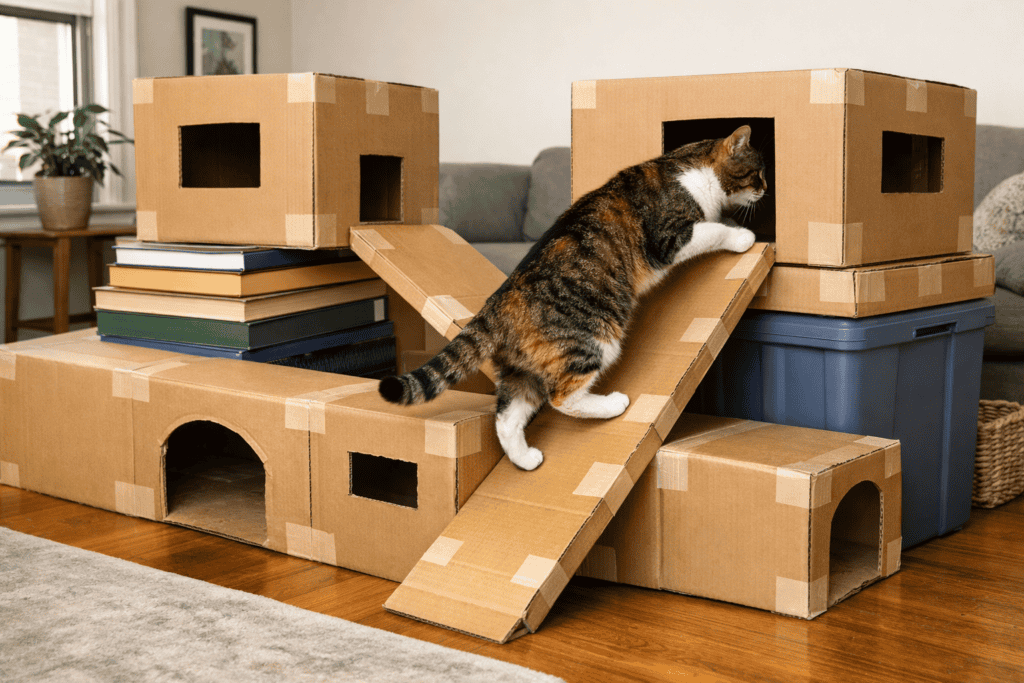
This is the most ambitious option but potentially also the most engaging.
What you need:
- 4 to 6 cardboard boxes (varying sizes)
- Packing tape
- Box cutter
- Sturdy books, bins, or small furniture (for elevation)
- Optional: ramps made from cardboard or small wooden planks
How to make it:
- Start with a base-level tunnel using 2 to 3 boxes connected end-to-end (follow the cardboard box tunnel instructions from earlier).
- Elevate one or two additional boxes on sturdy books, storage bins, or furniture so they sit 6 to 12 inches higher than the base tunnel.
- Cut openings in the elevated boxes that align with the base tunnel below, creating entry points between levels.
- Connect the levels by cutting a hole in the top of the lower box and the bottom of the upper box. Make sure the opening is large enough for your cat to climb through easily.
- Add a ramp if the height difference is more than 12 inches. Cut a piece of cardboard, score it lightly to create a gentle slope, and tape it securely between levels.
- Tape all connections firmly — elevated sections need extra reinforcement.
Tips:
- Test stability before letting your cat use it. Press on elevated sections to make sure they don’t tip.
- Start with just two levels. You can always add more later.
- Add side windows to elevated boxes so your cat can look out from different heights.
- Use heavier boxes (like appliance boxes) for elevated sections to prevent collapse.
Safety note: Multi-level tunnels need to be checked regularly. Cats jump, land hard, and put weight on structures in ways you won’t predict. If anything wobbles, shifts, or feels unstable, disassemble and reinforce it immediately.
This tunnel system works especially well for playful, confident cats who love climbing and exploring. It combines tunnels with vertical space, which makes it one of the most engaging DIY setups you can create without buying anything.
Adding Interactive Features (Optional)
Once your cat is using a basic tunnel, you can add features that make it more engaging.
Hanging toys: Cut a small hole in the top of a cardboard tunnel and thread string or elastic cord through it. Tie a feather toy, crinkle ball, or small stuffed mouse to the end so it dangles inside. Your cat will stop mid-tunnel to bat at it.
Peek-a-boo flaps: Cut a rectangular flap in the side of a cardboard tunnel, but leave it attached at the top so it hangs down like a door. Your cat can push through it or peek under it. Add crinkle paper behind the flap for extra sound.
Scratching surfaces: Wrap sections of the tunnel exterior with sisal rope or attach carpet squares using a staple gun. This gives your cat a place to scratch without destroying the tunnel itself.
Hidden treats: Tuck small treats or a pinch of catnip into corners or side pockets. Your cat will sniff them out during exploration, which makes the tunnel feel more rewarding.
How to Get Your Cat to Actually Use the New Tunnel
Some cats will dive into a new tunnel within seconds. Others will sit three feet away and stare at it for two days straight before cautiously sniffing the entrance.
Both responses are completely normal.
The worst thing you can do is pick your cat up and shove them inside. Forcing interaction risks creating fear, not curiosity. Your cat will associate the tunnel with being trapped or feeling anxious, and she’ll avoid it permanently.
Instead, set the tunnel up and walk away. Let your cat approach on her own terms. Cats are naturally curious. If something new appears in their space, they’ll investigate eventually. It just might take time.
If your cat seems hesitant:
- Leave the tunnel in a room she already spends time in
- Don’t hover or watch her intensely while she explores
- Let her sniff, circle, and retreat as many times as she needs
Patience here pays off long-term. A cat who chooses to explore the tunnel will use it regularly. A cat who was forced inside probably won’t touch it again.
Treats and Scent Trails
Start by placing a couple of treats just inside the entrance, just far enough that your cat has to lean in to reach them. Once she’s comfortable with that, place treats a bit farther in. Eventually, you can put a treat at the far end so she walks all the way through.
Keep treats small and use them sparingly. The goal is to build positive association, not train your cat to only use the tunnel when food is involved. After a few successful trips through, stop using treats altogether. Most cats will keep using the tunnel because the space itself is rewarding.
If your cat responds to catnip, try sprinkling a small amount just inside the tunnel entrance to invite investigation. Once she’s comfortable stepping in, scatter some more a bit farther inside, then toward the middle or far end so she is encouraged to naturally move through the space.
Scent matters too. Cats feel safer around things that smell like them. You can help by placing a blanket or towel your cat already sleeps on inside the tunnel.
Familiar scents make new objects feel less threatening. A tunnel that smells like your cat is one she’s more likely to trust.
Play Around It, Not Inside It
Use a wand toy or crinkle ball near the entrance. Let your cat chase it, bat at it, and focus on the game, not the tunnel. As she plays, she’ll naturally move closer to the entrance or even dart inside without thinking about it.
This approach triggers hunting behavior. Your cat isn’t being asked to “go in the tunnel.” She’s chasing prey. The tunnel just happens to be nearby. That lack of pressure makes all the difference.
You can also:
- Toss a small toy past the tunnel entrance so your cat runs toward it
- Drag a wand toy slowly past the opening to encourage stalking
- Roll a ball near the tunnel and let your cat decide whether to follow it
Once your cat enters the tunnel while playing, she’ll start to associate it with fun rather than something to worry about. After a few sessions, many cats will use the tunnel independently, hiding inside, watching from the entrance, or sprinting through during solo play.
Keeping It Fresh (Without Starting Over Every Week)
To keep things interesting, you don’t need to build a new tunnel every week. You just need to make the existing one feel slightly different.
Simple ways to refresh a tunnel:
- Move it to a different room or corner
- Flip it so the entrance that was facing left now faces right
- Add a new texture inside, like a soft towel one week, crinkly paper the next
- Change what’s nearby. For example, place it under a chair to start with, then move it next to a window later on
Even small changes make a familiar object feel new again. Your cat will re-investigate the tunnel, check the updated layout, and often re-engage with it like it’s the first time.
This is especially effective after a tunnel has been ignored for a few days. Instead of assuming your cat is “done” with it, put it away for a week. When you bring it back out — ideally in a different spot — many cats will treat it like a brand-new discovery.
